How to Transplant an Established Mrs G.G. Gerbing Azalea
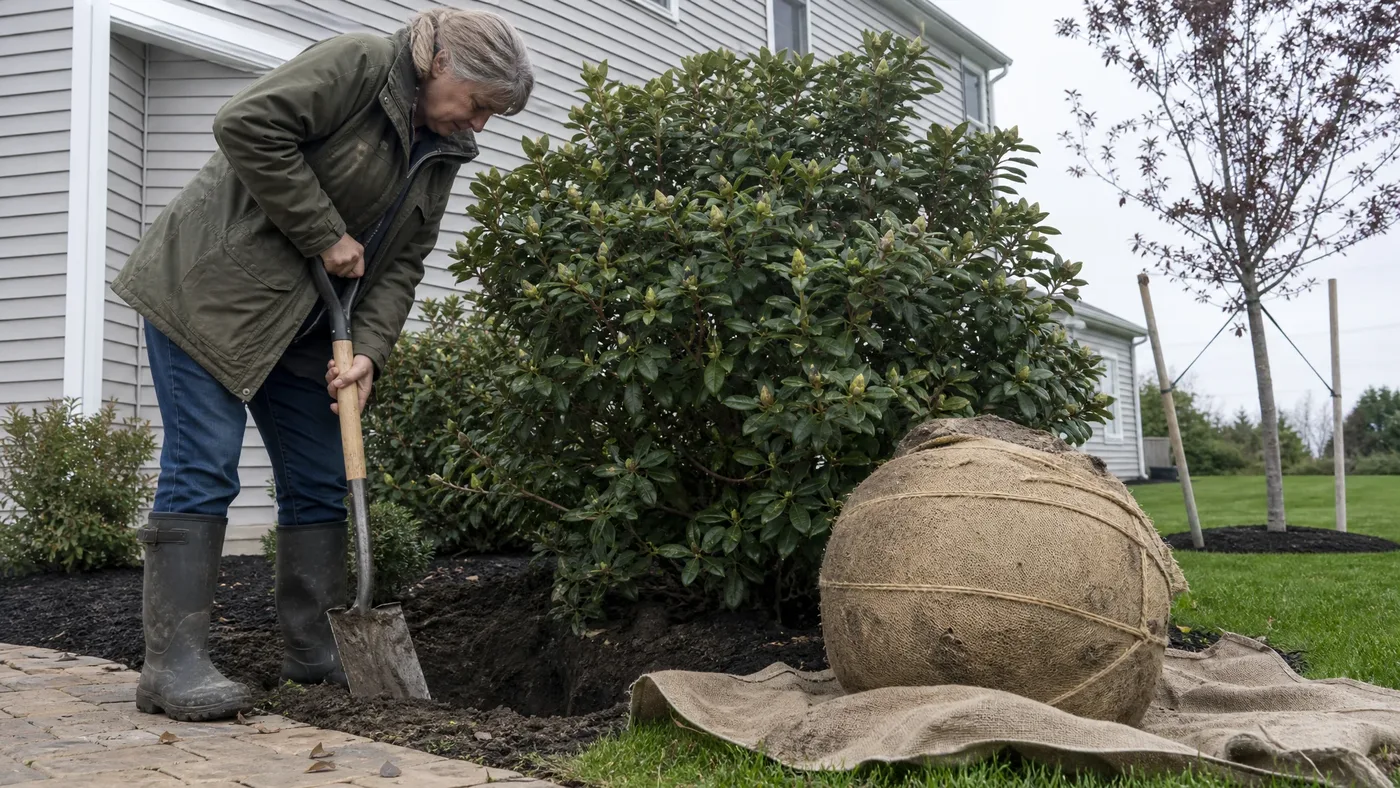
We still remember a late-autumn afternoon when we helped move a Mrs G.G. Gerbing that stood taller than our shoulders. The air was cold, the leaves were glossy and dark, and the root ball came out of the ground so wide and heavy that it took all of us to tip it onto a tarp.
That is the moment this job becomes urgent. The canopy overhead has thinned, the shrub has stopped pushing new growth, and you have a short stretch before the soil turns too cold or too wet to work.
Below, you'll find out all about moving an established Mrs G.G. Gerbing, including how to judge whether the shrub is worth the effort, how to prune its roots a season ahead, how to dig and wrap the ball, how deep to replant, and what the first year of watering and shade looks like. Done well, the shrub is blooming again by its second spring. Done badly, it yellows, sulks and sometimes dies.
Why We Moved Our First Mrs G.G. Gerbing Azalea
The first Gerbing we ever moved had grown up against a porch rail, and by its tenth year the branches were pressing on the siding and shading a window. Nothing was wrong with the plant. It had simply done what it was bred to do. Southern Indica hybrids are rapid growers that make very large plants in a few years, and NC State lists the group at 6 to 12 feet tall and 6 to 8 feet wide.
Most of the moves we hear about start the same way. A shrub planted as a small gallon-size plant now crowds a walkway, a gutter or a neighbor's fence line. Others are moved because a shade tree came down and the leaves began to scorch, or because water pools around the roots after heavy rain. A spot like that will not improve with time, and a shrub left in it is a candidate for root rot.
Moving beats replacing when the plant is large and healthy. A mature Gerbing carries years of branch structure and a full spring bloom that a young plant needs several seasons to match. The trade is that you take on a heavy, careful job, and you do it once, at the right time, with the roots prepared.
One thing to settle early: this guide is about relocating a plant that has been in the ground for years. If you are installing a young container plant, our guide to planting Mrs G.G. Gerbing for best results covers that, and most of its site advice still applies to the new spot you pick here.
Reading the Shrub Before You Lift a Spade
Walk around the shrub in the first cool week of fall with a trowel and a clear head. Scrape back the mulch, look at the soil surface, and turn a few leaves over. What you see in ten minutes tells you whether the plant is a good candidate or whether you are about to carry a problem across the yard.
Judge the Health of the Plant
A healthy Gerbing has dark, glossy leaves and firm stems, and the soil under the mulch smells like leaf mold. Work through these checks before you commit:
- Leaves that look bleached or stippled, with dark specks on the undersides, point to lace bugs. They are a nuisance you can treat, and they do not rule out a move.
- Wilting or yellowing in soil that is plainly wet is the pattern we worry about. Many Southern Indica cultivars are susceptible to Phytophthora root rot, and fungicide on an infected plant only delays its death.
- Dead wood at the base, or stems that pull loose with little effort, means the root system is already failing.
- Dark, firm roots near the surface are what you want to find. Brown, mushy roots mean you should stop.
Do not move a plant that fails the root check, because the ball would carry the disease to your new bed. If that is the situation, we grow Mrs G.G. Gerbing ourselves, and starting over with a young plant is the better answer.
Check the Window and the New Site
For most landscape plants, fall and early winter are the best time to move them, and in Florida the azalea season runs from November to February. Hardiness for the hybrid group runs from zone 6a to 9b, so the calendar shifts with where you live. The rule we give customers is to move after the leaves have settled for the season and well before the ground freezes hard. Your local extension office can name the dates for your area.
Prepare the destination before you touch the shrub. Azaleas prefer cool, partially shaded sites, so pick a place with morning sun and afternoon relief, and check our notes on sun and light needs. Test the soil too. It should be acid, below pH 6.0, and well drained, as covered in our guide to soil, pH and drainage.
Cutting the Roots a Season Ahead
The best moves we have made began months before the shrub left the ground, with a spade pushed straight down in a circle around the plant. That cut severs the long roots that run far from the stems and persuades the plant to grow new, fine roots inside the area you will dig. A shrub that carries those roots into its new home recovers faster and wilts less.
For a fall move, extension guidance is to cut a trench around the root ball in March to sever the roots and encourage new growth inside the confined area. Plan the calendar backward from your digging date. If you cannot do it in March, do it as early in the growing year as you can, and leave at least one full growing season for the new roots to fill in.
Mark and Cut the Trench
The same guidance gives a floor for the trench: a minimum diameter of 18 inches, or 12 inches of diameter for every inch of trunk diameter. Gerbing grows several stems rather than one trunk, so we treat that formula as a minimum and go wider on a big plant. A shrub in the 6 to 8 foot range deserves a generous circle. Mark it with a rope or a line of flour, then cut straight down with a sharp spade, making clean cuts and not tearing the roots.
Fill the trench with the soil you removed and water it in. Do not lift the plant or disturb the ball at this stage, and do not trim the top to make up for the cut roots. Azaleas should be pruned right after spring bloom, because pruning later removes next year's flower buds, and our guide to when and how to prune explains the timing.
Tend It Through the Summer
Between the cut and the move, the shrub is making new roots in a small area. Azaleas have shallow roots and little tolerance for poor drainage, so keep the soil evenly moist without letting it sit soggy. Leave the mulch in place, and do not skip watering in the dry weeks. If the leaves droop in the afternoon during a hot spell, that is the plant telling you it needs a deep drink.
Digging the Big Root Ball of a Mrs G.G. Gerbing Azalea
The surprise for most people is how the ball looks once the soil is open. A Gerbing's roots stay in the top layer of the ground, so the ball is broad and fairly flat, much wider than it is deep, unlike the tall, narrow plug you might imagine from a tree. A shrub that spreads 6 to 8 feet will carry a ball that is heavy even though it is not deep.
Get Ready the Day Before
Water the shrub deeply the day before you dig. Moist soil holds together around the roots, and dry soil crumbles away and leaves bare roots. Gather the tools in advance: a sharp spade, a digging fork, burlap, twine or rope, a tarp, and a few strong helpers. Tie the lower branches up loosely with soft cord so you can work close to the ball without snapping stems.
Dig and Undercut the Ball
Start just outside the trench you cut earlier, and dig a second trench around the shrub, working down on all sides until you reach the base of the roots. Because the roots are shallow, you reach the bottom sooner than you expect. Then slide the spade inward from each side and cut under the ball, angling slightly toward the center so the ball tapers.
Rock the ball gently and work the burlap beneath it, pulling it up on the far side as you tip the other way. Never lift or pull on the stems. Be ready for the moment the ball comes free, because the weight shifts all at once and the plant will want to tip. If you feel the ball cracking, stop and wrap it where it sits.
Wrapping, Hauling, and Keeping the Ball Whole
A ball that stays whole is the difference between a plant that settles in and one that sulks for two summers. The roots that matter are the fine ones at the edge, and they tear off when soil slides away from them. Wrap while the ball is still in the hole, before you try to carry it anywhere.
Pull the burlap up around the sides and over the top, and pin it with nails or tie it with twine, working in a crisscross pattern so the ball is bound in both directions. Pull firmly but do not squeeze so hard that you break the soil. A well-wrapped ball should feel like a solid mass when you push on it.
To move it, slide the ball onto a tarp or a sheet of plywood and drag it, or lift it with several people, holding from underneath. Do not carry the shrub by its trunk or stems. For a long haul, a wheelbarrow or a garden cart works if the shrub is not too tall. Keep the trip short, set the ball upright, and plant the same day if you can.
If the planting has to wait, stand the ball in shade, cover it with a damp blanket or burlap, and keep it moist. Wind and sun dry the exposed roots faster than most people expect, and a few hours of exposure in a windy yard can undo months of preparation.
Setting the Mrs G.G. Gerbing Azalea in Its New Home
At the new site, the hole is the last big decision, and it is easy to get wrong in the direction of too deep. Extension guidance for azaleas is to dig the planting hole wide (two to three times the root ball width) but no deeper than the root ball. The width gives roots loose soil to push into. Azaleas are shallow-rooted, so the ball itself must go back in at its old depth.
Depth is the part that kills moved azaleas. Plants are much more susceptible to root rot when they are planted too deeply, so we set the top of the ball slightly above the surrounding soil level. Look at the old trunk base for the soil line left on the stems and use it as your guide.
Work through these steps once the hole is ready:
- Loosen the bottom of the hole and add back enough firm soil that the ball sits at its original depth without sinking.
- Lower the ball in, straighten it by sight from two directions, and turn the best side toward the view.
- Cut the twine and pull the burlap back from the top and sides. Remove any synthetic wrap entirely.
- Backfill with the soil you dug out, which keeps the pH where the plant is used to it, and firm it with your hands and then with water, not by stamping.
- Build a low ring of soil at the edge of the ball to hold water, then add a layer of mulch that stays clear of the stems.
- Water slowly until the whole ball and the soil around it are soaked.
Stand back and check the shrub from a distance. If it leans or sits low, lift and adjust it now. Fixing a bad depth in a week is easy, and fixing it a year later means a second move.
The First Year of Watching and Waiting
The first hot afternoon after the move is when most people panic, because even a well-moved Gerbing may droop and curl its leaves. Check the soil before you decide anything. If it is dry two or three inches down, water deeply. If it is wet, hold off and look at drainage instead. Our guide to watering Mrs G.G. Gerbing covers the details, but in the first year, steady and deep beats frequent and shallow.
Shade helps. Stretch a shade cloth or set a temporary screen to block the hardest afternoon sun for the first summer, particularly in the Southeast, where summers run long and hot. We wait for new growth before we feed, and we protect the shrub from deer, since NC State notes that the group is frequently damaged by deer.
Use this table to read what the plant is telling you:
| What you see | Likely cause | What to do |
|---|---|---|
| Drooping leaves, soil dry below the surface | Roots still too few to keep up | Water deeply, add shade in the afternoon |
| Drooping or yellowing leaves, soil wet | Poor drainage or planting too deep | Check the depth, pull mulch back, improve drainage |
| Yellow leaves with green veins | Soil pH drifting above the acid range | Test the soil and correct it gradually |
| Bleached, stippled leaves | Lace bugs on the undersides | Inspect leaf undersides and treat |
| Few or no flower buds the first spring | Normal recovery | Be patient and keep watering |
In our rows, a moved shrub often sits quiet through its first spring and puts on real growth the second. Do not judge it by the first season. Keep it watered through its first dry spells, and prune only after it finishes blooming.
What Settles an Old Mrs G.G. Gerbing Azalea
A successful move comes down to a few habits: check the roots for rot before you start, cut them a season ahead, dig a wide ball and keep it whole, and replant it at the old depth in cool, partly shaded, acid soil. After that, the work is mostly patience, steady water and shade through the first hot months.
If you do those things, the shrub that looked wrecked in the wheelbarrow will be standing quietly in its new place, dark leaves firm and each branch tip carrying buds, and by the second spring it will open into bloom again as if it had always been there.
Mrs G.G. Gerbing Azalea
Nursery-grown Mrs G.G. Gerbing Azalea in sizes from 1 Gallon, shipped to your door.
From $26.99
Shop Now →Mrs G.G. Gerbing does its best in our rows with acid, well-drained soil and dappled shade, and we pay close attention to the leaf color and bud set that show a plant has settled in. Everything we sell is raised by our own hands, because we are a small team of growers and not a warehouse. If moving the old shrub sounds like too much, a young plant from us is a gentle way to begin again.